The Step-by-Step Guide to First-Time Setup of Your SafePal Wallet
My first cryptocurrency hardware wallet was the SafePal S1 wallet. I read dozens of reviews before the purchase. Yet, when I started setting it up, I ran into things that were not covered anywhere. Based on my own experience, the official tutorial, and the clarifications from Customer Service, I put together a detailed tutorial on SafePal hardware wallet setup. Please make use of it and take a moment to share your feedback in the comments.
4 Hidden Tips for a Successful First Use of Your SafePal Wallet
- Charge it well before the first use
- Allow enough time for the setup
- Scan the QR code against a well-lit background
- Don’t let cameras catch your seed phrase
The above points received only minimal or no coverage in the reviews or the user manual. They are, however, crucial to setting up SafePal successfully.
They are detailed below as part of the step-by-step tutorial on the SafePal wallet setup.
What’s Missing in the SafePal User Manual and How to Fill the Gaps
There are two versions of the user manual. The newest version is not on the SafePal website. It is here: https://safepalsupport.zendesk.com/hc/en-us/articles/360046474852-User-Manual.
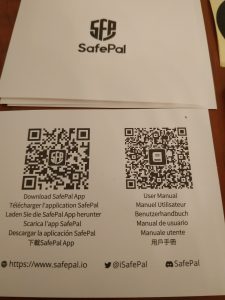
When you get the wallet, you do not get a hardcopy user manual. Instead, the package includes a QR code card which can be scanned and will open the new user manual page.
The earlier version of the manual is on the company’s official website. It ranks higher on Google at the time of writing this article in 2022, even though it warns that the content might be outdated. It is here: https://docs.safepal.io/safepal-hardware-wallet/user-manual.
The user manual is not very detailed. It refers you to a page called “Set up your SafePal wallet in 3 min.” This is the page with fairly detailed instructions. But it is over 1500 words long, so reading it may take you 3 minutes. It is likely to take longer to perform the actions.
Step 0: Taking a Closer Look at the SafePal Hardware Wallet Box
When you get your SafePal device, make sure it is a new and authentic device. The wallet gift box should be intact with the anti-counterfeit stickers on it.
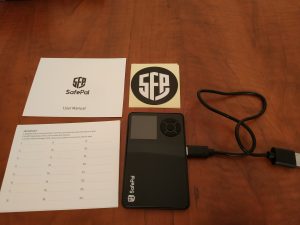
Check that you received all the items:
- The wallet itself
- USB cable
- Cleaning cloth
- Stickers (2)
- Mnemonic Phrase Cards (3)
- User Manual/Download App card
Do you think you are ready to use it? Well, not so fast. You want to charge the device first.
Step 1. Don’t Forget to Charge Your Device Before Setup – Here’s Why
According to the company’s customer service, when you charge your device for the first time, you have to keep it plugged in for 48 hours. Use a wall plug. Do not charge it through a computer: if the computer gets turned off or enters standby mode, the charging will stop.
There is no indicator showing whether the device is charging. Customer service told me: “when you charge your device for the first time, you can check the status of the battery charge by powering it up, then checking if the charging symbol (the lightning symbol) is still there. If the symbol is not there anymore, that means that the device is fully charged.”
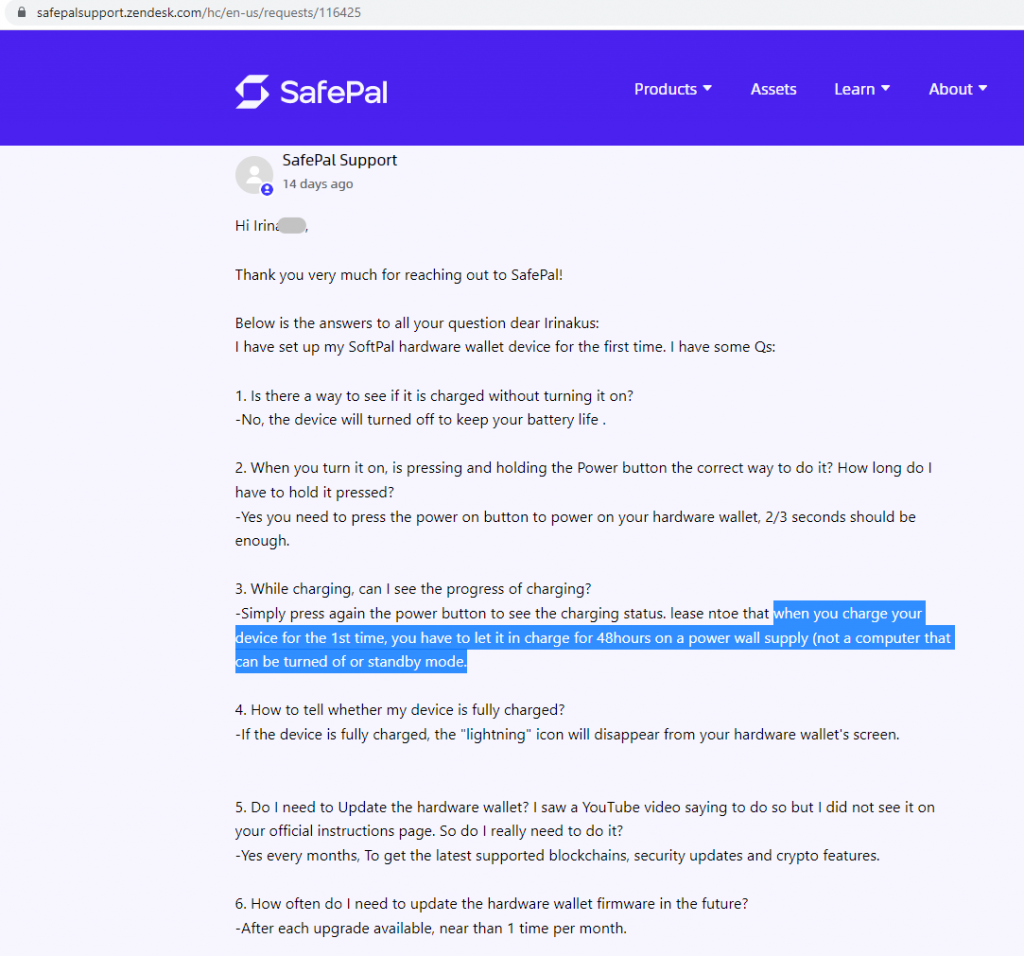
My experience: I did not see any charging symbol at all before I went through the steps covered below. I hadn’t heard about 48 hours yet. I charged it for about 3 hours. This was good enough to start with, but the battery indicator showed it was about 60% full.
Alternatively, you may continue with the remaining steps when the device is connected to a power supply. In this case, I suggest you get a longer cable. The one in the box might not be long enough to handle the device in the next steps. (The charging cable from your mobile phone should do. Technically speaking, you need a USB Type C cable.) You will see in the steps below why a longer one would be helpful.
Thereafter you should charge the battery at least every two months. Don’t let the battery drain completely or it won’t hold a charge.
Step 2. Don’t Rush It: Make Sure You Allow Enough Time for Device Setup
It’s advisable to have one to two hours so you are not in a rush as you do the setup. The steps are easy to do and may take less time, but being in a rush never helps.
My experience: It took me 1 hour and 42 minutes to do all the steps. But I was taking photos and researching various things as I moved ahead. You might be faster.
But the title of a SafePal manual “Set up your SafePal wallet in 3 min” is misleading. I could not have done it in 3 minutes. Please share in the comments how long it took you.
Step 3. Is Your Seed Phrase Safe from Cameras? Here‘s What You Need to Know
If you have a webcam or a laptop camera, chances are that a bad guy is recording you without your knowledge. Cover up your webcam or laptop camera when writing down your seed phrase.
If you are in a café, in a library, or at work, the place might have security cameras.
Do your setup in a place where your confidential seed phrase will not be visible to any other people or cameras.
Also, do not photograph the seed phrase with your mobile device. Even if you don’t send this photo anywhere, the phrase may be compromised. I know a lady who got funds stolen from her account after she photographed her mnemonic phrase with her iPhone. She did not send the photo anywhere. Within a few hours of taking that photo, her assets were transferred from her wallet to a mysterious address.
Step 4. Let the Setup Begin: Turning on Your Device and Selecting the Language
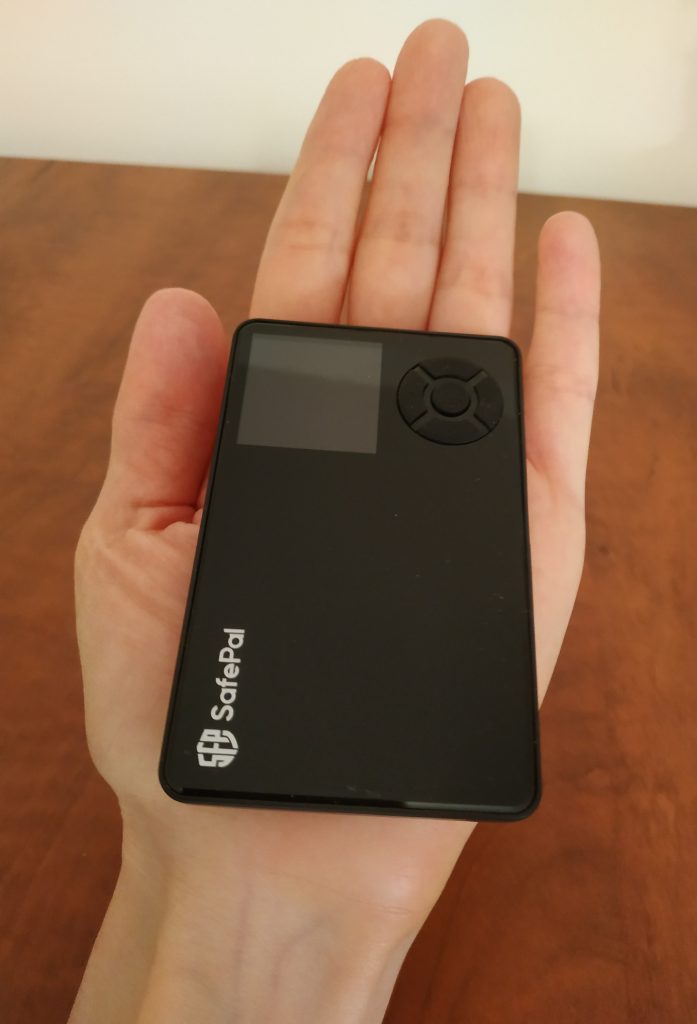
The power button is to the right. Press and hold it for 2-3 seconds.
The screen will light up. Select the language using the navigation buttons. Press OK once the language is selected.
A Device Authentication screen comes up right after selecting the language. It says: “To make sure this device is new and authentic, please scan the coming QRcode with your mobile device.”
Press OK to go to the next screen. You will see a QR code that you are supposed to scan with your mobile phone. Now the tricky part begins.
Step 5. Making Sure Your SafePal Wallet QR Codes Scan with Ease
Multiple people have reported SafePal QR Code scanning trouble: it may take a lot of fidgeting to get the wallet QR code to scan. The glossy black border seems to cause this.
The solution to this problem was found by Reddit users. Scan the device against a very well-lit white background. A light fixture behind it could help. Then the QR code works like a charm.
Other Reddit users have suggested covering the screen with a piece of paper; I have not tried this option. Scanning against a bright white background did the trick.
Having the device already charged and not being in a rush could help you get over this scanning hump.
Step 6. Confirming the Authenticity of Your Device
Device Authentication is a procedure done at the start of the first use of a new SafePal hardware wallet. It helps to make sure the device is authentic.
Once the QR code has been scanned, a verification page will open on your phone. Type the 6-digit code that you see on your hardware wallet after you’ve pressed OK on the QR code. Then click “Authenticate” on your phone.
The message on your phone should say: “Congratulations! This device is an authentic device, and this is the first time of its authentication. Please scan the QRcode shown on the webpage to activate this device.” (If you don’t get this message, please contact support.)
Then scan the QR code shown on the phone with the SafePal camera. The camera is to the left. You may have to get used to its location, as it is not in the center. Get the QR code into focus.
The activation process might take a few minutes. Please wait patiently.
After activation, you will see an illustration of buttons. It orients you to the different buttons on the device and what they do.
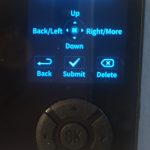
After you press “OK,” you will get a Welcome screen: “Welcome to SafePal! It will take a few steps to configure your wallet first. Are you ready? Let’s begin.”
Step 7. Creating or Importing a Secure Seed Phrase
The device prompts you to create a new wallet or use an existing one. In this context, a “new wallet” is a new seed phrase (also called a mnemonic phrase) that you will use as the key to your assets.
Let’s select creating a new one. The screen on the device says “new mnemonic phrase will be created.”
If you want to know more about the seed phrase (mnemonic phrase), you can click “What is Mnemonic” and you will be walked through a few screens explaining it. Or you can click “Create now” right away.
The next screen says “Choose No. of Mnemonic.” This means you need to choose how many words your phrase will consist of. The longer the phrase, the more secure it is. So I selected 24.
Now comes the point where you want to be very sure nobody is watching over your shoulder or through your webcam, as covered above.
The phrase is going to be shown in your hardware wallet. Handwrite your phrase on at least 2 cards and proofread it back to ensure that the words are readable: your D does not look like O or whatever. Record the words in sequence.
The wallet prompts you to verify your mnemonic phrase. Follow on-screen instructions. Be sure to stay away from any cameras as you do this.
Congratulations, you have created your mnemonic phrase!
Alternatively, you could import an existing phrase if you were moving your assets to this new device. Detailed instructions on this are on the official website under the heading “Recover My Wallet.”
Get the mnemonic phrase cards securely stored, preferably in multiple locations. For example, you could put a card in a bank box or keep it at your parents’ house.
Step 8. Setting up your PIN code
This is easy enough: choose 6 to 12 digits that you can easily remember. Make sure these are not easy to guess, i.e. do not use “5555555” or “123456”.
What is the SafePal PIN Code and How Does it Work?
The PIN code is like a password for your hardware wallet. It secures your personal access to the device. If a thief got hold of the device, they would not be able to access your funds as they do not know your PIN.
However, if a thief got hold of your seed phrase, they would access your funds regardless of whether they know your PIN or have your hardware wallet. If your device gets damaged, the PIN is useless, but you can still recover your assets through the phrase.
PIN codes can be viewed as a shorthand way to authorize transactions with SafePal. While the actual digital key to your assets is the seed phrase, the wallet shortcuts your typing by letting you type the PIN instead of having to type all the words that make up your seed phrase.
For advanced users: In addition to the PIN code, one can enable a more advanced option called a “passphrase.” Please comment if you are interested so I can provide a new article on it.
Step 9. Naming your wallet
Select a name. You can select any name you wish.
The wallet software will add 3 random characters to the name you’ve selected. This is a security feature.
Step 10. Downloading a SafePal App
In addition to your SafePal hardware wallet, you need a SafePal app installed on the phone
Download the SafePal app by using the official link or scanning the QR code provided by your device or on a card that came with it in the package. Make sure you download only the official software. You can double-check this by looking up the number of downloads: fake versions have very few.
Why You Need a SafePal App in Addition to Your Hardware Wallet?
Your hardware wallet is not connected to the Internet. But all your transactions require an Internet connection. The SafePal App on your phone will execute transactions on the Internet. It will ask for authorization from your hardware wallet when appropriate. Thus, your private key remains secure: it is never connected to the Internet.
Step 11. Configuring the SafePal App on Your Phone
If this is the first time you use the SafePal App, go through the initial setup. You will set your password and other security features, such as a graphic key. Follow the on-screen instructions. They are pretty similar to any other app.
Step 12. Pairing up Your SafePal App and Your Offline Wallet
On your phone: The SafePal App will ask you to select a Software Wallet or a Hardware Wallet. Select the Hardware Wallet. Then the app gives you a few words of explanation and displays the QR code. You need to scan it with your hardware wallet.
On your hardware wallet: Press the Power button and hold for a couple of seconds. Select “Scan.” Then use the wallet to scan the QR code shown on your phone. This action establishes a connection between your hardware wallet and an app on your phone.
The hardware wallet will ask for confirmation that you’d like to connect. Then it will prompt you for your PIN code. Type your PIN code. Then you will see a QR code on the wallet device.
On your phone: Press Next in the SafePal App. It will open the camera. Use the phone to scan the QR code on the hardware wallet (ensure it is backlit as earlier). There might be more than one QR code to be scanned. Once done, your wallet opens on the phone.
Congratulations! Your setup is done! Now you can update the firmware and start using your wallet.
Is the SafePal Wallet Safe?
SafePal hardware wallet has a great number of security features to protect your funds. But bad guys could trick you into doing something that’s not in your best interests. Here are the key points to follow to keep your funds safe:
- Never authorize a transaction when a stranger asks you to. They may say that you would earn money if you do so. If you want to test a new way of earning, at least do this from a wallet that has no funds other than those you want to risk.
- Never store the seed phase (mnemonic phrase) on a phone or computer. Never let it be photographed. Only store it on paper, away from any cameras. For greater security, you can also use a SafePal cypher device.
- Do not lose your seed phrase. Keep it safe from any strangers. Make sure your family members also know the importance of keeping it safe.
- Always review any transaction before confirming it. The blockchain transactions cannot be reversed.
- Follow only the official links from the official website. Never follow any links shared on social media or elsewhere.
- Never enter your seed phrase online. Not even when a seemingly official application asks you to. The official application never asks for your recovery phrase.
As long as you follow the usage guidelines, the SafePal hardware wallet itself is considered quite safe.
Пожалуйста, прокомментируйте: Did this guide help you? Was your experience any different? How long did it take you to set up your SafePal wallet?
About the author:
I have been investing in cryptocurrencies since early 2022. I studied the subject and took half a dozen courses on being a crypto investor and a crypto programmer. SafePal S1 hardware wallet was my first cold wallet. I am sharing my experience in the hopes that it helps you on your crypto journey.

Hello Irina,
Thank you for sharing this information! It has been helpful. Today is April, 24, 2025, and I would like to ask how are things going with your Safepal Wallet? I am a Safepal member.
You’re so cool! I don’t suppose I have read through something like that before.
So great to find someone with unique thoughts on this subject matter.
Really.. thanks for starting this up. This web site is something that is required on the internet, someone with a bit of originality!
Thanks a lot for the kind words, Curtis!
Hello there! This blog post couldn’t be written any better!
Going through this post reminds me of my previous roommate!
He continually kept talking about this. I am going
to forward this article to him. Pretty sure he’s going to have a good read.
Many thanks for sharing!
Hi Dana, I appreciate your response! Hope this post helps your roommate! You’re always welcome to leave any feedback.